Monday, 29 February 2016

Growing Sewing Pattern Collection

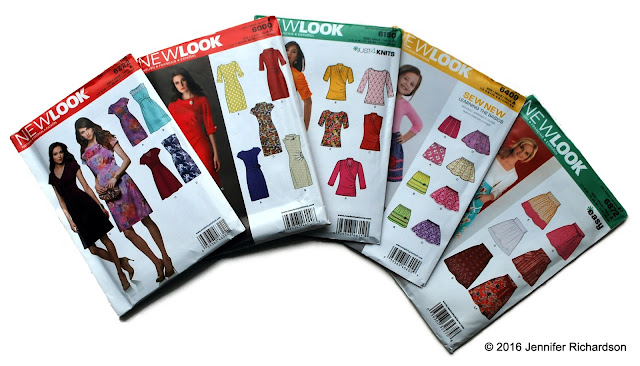
A few days ago I received the Simplicity New Look newsletter informing me that New Look sewing patterns were currently half price on their website. This ignited a conflict in my head with one voice telling me I have enough sewing patterns and the other voice was shouting over the top that they’re on sale! My sewing pattern collection is growing quite large now and I have yet to make up most of them. But I love a sale and at £2.98 a pattern the sale voice won and I caved in to buying 5 new patterns to add to my collection.

© 2016 Jennifer Richardson

1. New Look 6322:
This is probably my favourite of the 5. I fell in love with the neckline of view C & D and the pleats on the bust. I also like that it can be made up in both woven fabrics and knits. I didn’t feel I had anything with a similar neckline already and further justified it as I thought it may work for some fabric I bought back from Japan last July!

2. New Look 6000:

This pattern reminded me a little of the Sew Over It Joan dress (I think its the neckline of views B, C & D), which I already have and have yet to make. But, like 6322, I liked that it can be made in both woven fabrics and knits and hence it made it into my basket! I also liked the side ruching.

3. New Look 6150:
I liked the ruched sleeves and neckline of view B and have a fabric that I thought might work for this.

4. New Look 6409:
This pattern I bought with my niece in mind who is nearly 2. It is a very basic skirt pattern so not one I would buy full price. But at half price I thought it was worth having so I can hopefully whip up some skirts when she’s a little bit older without have to use my brain too much.

5. New Look 6872:
Again this is a basic skirt pattern I wouldn’t have bought full price. I have some fabric my Mum bought me back from Japan that I have been meaning to make into a skirt like this and was going to try and do it without a pattern. However, for £2.98 I thought it was worth just buying it and I liked that this one comes into the waist as opposed to being designed to sit lower.

I have started keeping a record of the patterns I own using a Pinterest board so I can easily see what I have and therefore when I am looking at patterns I can better judge where I may have gaps! But perhaps I should also unsubscribe from receiving newsletters informing me of sales so I’m not tempted to keep buying more patterns before doing something with the ones I already have! And don’t get me started on fabric…

Friday, 26 February 2016

Little Black Dress – Burda 6829

I made this dress before Christmas, but hadn’t gotten around to posting it. This was my first dress using stretch fabric! I bought some black knit fabric on Leicester market a while back that has been sitting in a box waiting to be used along with Burda’s 6829 pattern that I bought with the fabric in mind.

© 2016 Jennifer Richardson

I made it with long sleeves, but the length of view A and I straightened the hem of the underneath panel so that just the top layer swooshes up as I thought it would make it a little less evening-y. And I'm pretty pleased with it!

The fabric was quite easy to work with and thankfully I didn’t have to do much in the way of unpicking as trying to unpick black stitches on a black knit was a little tricky!

When sewing with woven fabrics your finished garment measurements should be larger than your body measurements (referred to as positive ease) to allow breathing room to move around and sit down. In contrast, stretch fabrics have more give in them so to make a garment that is close fitting with stretch fabrics the finished garment measurements should be smaller than your body measurements, which is referred to as negative ease. My bust and waist measurements put me at a size 14. The finished garment measurements for this size were only ½” smaller than my measurements, which I didn’t think was a lot and I wanted my dress to fit snuggly. So I decided to cut the size 12 instead. My hip measurements put me at a size 18…yes I am pear shaped! So when tracing the pattern I graded out from a size 12 at the waist to size 18 on the hip. I didn’t go down a size on the hip as I didn’t want it to be too clingy in that area.

Before I started sewing any seams, I overlocked all my edges. When sewing the seams I used the stretch stitch zig zag that looks like a lightning bolt. I did buy a ballpoint needle…but I forgot to use it! I don’t think my seams suffered too much for it though. All the hems were finished using a twin needle.

© 2016 Jennifer Richardson

What I liked about this pattern:
  • Pretty quick and reasonably straight forward so would agree with the pattern difficulty level being classed as easy.
  • I didn’t really have to make any fit adjustments. Using stretch fabric is more forgiving in this respect I think. However, I don’t think the bust dart is in quite the right place, but it is too noticeable with the black fabric. And having worn it a couple of times now I do think I might have to widen the shoulders slightly as I don’t think they’re sitting quite right.
  • There was no faffing around with zips or buttons.

What I didn’t like:
  • The instructions are not as linear as I would like. Step 1, for example, states that the hems should be finished with a twin needle, but it didn’t really specify whether you needed to do all the hems at the start or not. The top panel certainly needed hemming before sewing the seams. So you need to read the pattern through at least once before you start, which I guess is good practice anyway. Because of this I don’t think I did things in the exact order of the pattern.

Would I make this pattern again?:

  • Yes, definitely. I think I could make it quicker a second time round. The dress is very comfy and I can picture it in some different colours. 


Friday, 19 February 2016

To infinity & beyond! Silk infinity scarf.

A few months ago my mother-in-law Aileen gave me some beautiful silk fabric in 2 different designs…there was metres of the stuff and I was more than delighted to take ownership of it!

Aileen thought that the lighter-weight of the 2 fabrics would make beautiful scarves and she was after an infinity type scarf that she could wear a bit like a necklace with a jumper and with no ends to get in the way. So I thought I would try and make her one for Christmas.

I found a few tutorials for making infinity scarves via Pinterest and roughly followed this one from the I Heart Nap Time blog. Mine took somewhat longer than 20mins though!

This was the first time I’d sewn with silk. I knew silk can be a little tricky, but I thought “hey, how hard can it be?” Well, I learnt that it can indeed be pretty tricky! I needed to cut a long narrow rectangle to make the infinity scarf, but it was sooooooo hard to cut the fabric straight as it kept moving all over the place! I tried to do some research into how I could prevent this. One suggestion was to use a fabric stabiliser, but that would have meant ordering some and waiting for it to arrive and I didn’t have time for that (though I’ve since read that you can use gelatine!). So the other suggestion was to cut the fabric between layers of tissue paper. This did help and I eventually managed to cut out a roughly rectangular shape measuring approximately 30inches by 15inches for making a single loop infinity scarf.

Cutting out was by far the hardest part. So I decided to make the scarves from a single piece of fabric to minimise the amount of cutting out and to reduce the number of seams due to the delicate fabric. The silk did fray quite badly as well and as the fabric has a slight transparency to it I decided to use a French seam for the long seam. To do this:
  1. Fold the fabric rectangle in half length-ways with wrong sides together. 
  2. Stitch along the long seam approximately 0.5cm in (or half of your seam allowance) using a fine needle. This creates a tube of fabric.
  3. Turn the tube of fabric inside out so that right sides are now together. Press along the long seam before stitching along the long seam again approximately 0.5cm in (or half of your seam allowance) ensuring that the rough edges of the first seam will be encased by the next seam thereby hiding the rough edges. 
  4. Turn the fabric tube inside out again so that right sides are facing out and press.
To close the loop I matched up the 2 ends of the long seam and pinned together. It was not possible to use a French seam to close the loop so instead I used my overlocker to sew the 2 ends together as far round as I could, leaving a small opening which I then hand stitched closed.

My machine handled the silk well and I didn’t find it moved about at all really. Overall I was pretty happy with the result and once I made one I was able to churn out a couple more for presents much quicker.

© 2016 Jennifer Richardson

Thursday, 4 February 2016

“I make things with my bear hands” Emmeline Tee

When I drew my friend Jen in our work secret Santa draw my immediate reaction was “YEEEEEEEEESSSSSSSS”. Jen is a fellow crafter and my initial thought was that she would be easy to buy a gift for. But then when I thought about it I realised I wanted to make sure I did something really good. I knew she would be more than happy if I just bought her some fabric, but at the end of the day that wouldn’t require much effort and she can buy herself fabric anytime. So I started thinking of what else I could do. Jen is known as ‘The Bear’. I remembered a t-shirt I had seen in Asda ages ago that had a bear on it holding tools and it read ‘I fix things with my bear hands’. And it got me thinking whether I could make her a similar t-shirt, but craft themed to read ‘I make things with my bear hands’ instead. Of course I decided that I couldn’t just buy a plain t-shirt to print on, but instead needed to make one from scratch.

I love The Little Tailoress blog and had been looking for an excuse to purchase the Emmeline Tee pattern for some time, but had been trying to resist as I have so many sewing patterns that I have yet to do anything with. But I felt making a t-shirt for Jen gave me the perfect excuse to add this pattern to my collection.

I purchased the PDF version of the pattern. PDF patterns can be a faff to stick together, but then so is tracing a paper pattern, which I try to make myself do so I always have the original to go back to. I do quite like PDF patterns for the reason that you always have a permanent copy that you can print as many times as you like. So if you need a different size, ruin a copy, or want to make any modifications you can just print another copy. Plus, in printing on paper your pattern is more robust than tracing paper.

The Emmeline Tee pattern includes 3 versions all of which can be made in woven or knit fabrics, detailed instructions for which are included. I decided to make version 3 using a grey marl t-shirt jersey I picked up from Lili Fabrics stand at the Stitching, Sewing & Hobbycrafts show at the NEC, Birmingham in November.

Version 3 of the pattern only has 3 pattern pieces (front, back, and neckband). So it was super quick to cut out the fabric. I cut out a size S for Jen, but to the largest size on the hem to give a tiny bit of extra length in the body. When I come to make myself an Emmeline Tee I think I would want a bit more length in the body so will have to lengthen the pattern.

Following the instructions I started by overlocking all the raw edges of my pattern pieces. Then it was just a case of sewing up the side seams, attaching the neckband and finishing the hems and edges using a twin needle. The pattern is so clear and straightforward that it makes up in next to no time.

I enlisted the help of my husband Steve for the design to go on the front as he is very good at graphical stuff and design. So I told him what I wanted and he put it together for me.

Once the t-shirt was made up, next thing I had to try and figure out was how to get it printed. I did quite a lot of research into the various methods of printing. The cheapest is to buy an iron-on transfer. There are many websites that allow you to upload your own design and they will post you the transfer for you to iron onto your t-shirt yourself at home. However, I read that iron-on transfers aren’t really made to last and can perhaps only withstand 4-5 washes. I wanted Jen’s t-shirt to be more durable than this so I looked into other options. I decided that what I wanted was direct to garment printing so set about trying to find somewhere that would be willing to print on my own t-shirt rather than one of theirs. Fortunately I found ExampleUK who happen to be based just a couple of miles away from where I live. They were more than happy to do a one-off print using my design and t-shirt and I was so pleased with the result. I think it looks so professional.

I was soooooo excited about giving my secret Santa gift. I knew Jen would probably guess I was her secret Santa straight away, but I didn’t care as I was just dying to know what she thought of it and she loved it!

Here is the finished article:

© 2016 Jennifer Richardson
I am looking forward to making myself a few versions of the Emmeline Tee and already have fabric lines up to make about 3-4 different versions!